Use user data in success message and mails
You can use Visforms to insert placeholders into the email and the success message. These are replaced with the transmitted user input before the mail is sent or the text is displayed.
With this feature you can:
- Design texts very individually according to your requirements.
- Design the layout of the emails, including the display of the transmitted data.
The basics
TinyMCE by default
We use so-called text areas to enter long texts, such as mail texts or the success message. Joomla comes with so-called WYSIWYG (what you see is what you get) editors to give you the opportunity to format these texts without much knowledge of HTML. By default, this is the WYSIWYG editor TinyMCE.
Two more standard editors
Editors are Joomla plugins of the “Editor” plugin type, which are activated and deactivated in the plugin manager in the administration of your website. In addition to the TinyMCE editor plugin, Joomla has two other default editor plugins, the “Code Mirror” and the “None” editor. Other editors are available as third-party extensions.
Activate at least one editor
In order for your Joomla installation to work correctly, you must have at least one editor plugin activated.
Which is the default editor?
You can activate as many editor plugins as you want. In the global configuration you specify which of the activated editors should be used as the default editor. Depending on your settings in the user administration, registered users may be able to set their own different standard editor for themselves.
Note: If you do not want to use a WYSIWYG editor, then select the editor "None" as the default editor.
Buttons to insert
Furthermore, Joomla comes with the so-called editor buttons. These are displayed in or below the editor’s user interface as a button or icon. Examples of this are the “Articles” button and the “Images” button. With their help, you can easily insert article links or images into a text. Editor buttons are also Joomla plugins. They are of the “Editor-xtd” type.
Note: Visforms uses its Editor-xtd plugin "Button - Visformfields" to make it as easy as possible for you to insert the placeholders mentioned above.
Sometimes only TinyMCE works
Normally these editor buttons work very well in all editors. However, if you have more than one editor input field on a page, you can have real problems with the editor buttons. This is the case, for example, within the form configuration. Then the editor buttons only work with the TinyMCE editor as you would expect. The editor buttons will then no longer work with the Code Mirror Editor, the “No Editor” or a third-party editor like the JCE.
Note: You must therefore ensure that the TinyMCE Editor plugin is activated. Also make sure that the plugin "Button - Visformfields" of type "Editor-xtd" is activated.
Insert placeholders into the texts
Visform’s own editor button
Visforms has its own editor button Visforms placeholders, which can be used to insert form field placeholders into the success message and the email body.
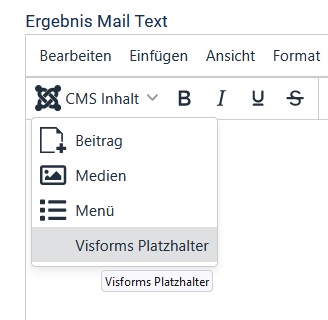
This button works similar to the Articles button or the Images button. A mouse click on the “Visformfields - Button” opens a popup window with a list of all fields of the form that can be inserted as placeholders.

Click on the field title and the placeholder for that field will automatically be inserted at the current cursor position in the editor input field.
Since the form configuration contains several editor input fields, the Visforms placeholder button only works correctly with the TinyMCE editor. The reasons for this have already been described above. Therefore, Visforms tries to force the use of the TinyMCE editor in the form configuration.
Note: If the TinyMCE editor plugin has been deactivated for some reason, inserting visforms placeholders via the editor buttons is no longer possible.
Additional placeholder options
Visforms offers additional options when replacing placeholders for some field types. For example, for fields of type “File Upload” you can determine whether the placeholder is replaced against
- the file name,
- the original name of the file,
- the local or
- the complete path to the file, or
- a link to the file.
With the Visforms Subscription you can also exchange the placeholder for the actual image if the uploaded file is an image.

All placeholders with options can also be inserted using the editor button Visforms - Placeholder.
Insert placeholder by hand
Suppose you want to use user input in the mails or the success message and have deactivated the TinyMCE Editor plugin for some reason. Then you can easily insert the placeholders by hand. Enter the string ${fieldname}. In the string, replace “fieldname” with the name of the field you want to use as a placeholder.
For example, if you have created a field that has the value “street” in the “Name” option, then the corresponding placeholder is ${street}.
Placeholders with options have the format ${fieldname|OPTIONSNAME}. The option is appended in uppercase after a separating “|” (pipe) character.
The following options are available:
- ORGNAME, PATH, FULLPATH, LINK for the field type “File Upload”
- DISPLAYOPTIONVALUE for the field types “Listbox”, “Radiobutton”, “Checkbox group”
- LAT, LNG for field type “Location” (Visforms Subscription only)
- ASIMAGE for the field type “File Upload” (Visforms Subscription only)
- DISPLAYOPTIONVALUE for the field types “Listbox Sql”, “Radiobutton Sql”, “Checkbox Group Sql” (Visforms Subscription only).
In addition, you can use the following “general placeholders” for form and record information. The names are largely self-explanatory:
- ${formtitle},
- ${id},
- ${created},
- ${modified},
- ${ipaddress},
- ${currentdate}.
Fields of the type Submit-Button, Image Submit-Button, Reset-Button and Field Separator do not recognize placeholders.
Note: If you misspell a field name or use a field with one of the above field types, the placeholder is simply removed from the text.
Please note that a form field that does not contain any user input (e.g. because it is not a mandatory field) is simply removed from the text. So please think carefully about which fields need to be made mandatory.
Create pretty emails
You can use placeholders to create nicely formatted emails.
- Disable the mail option “Send data”.
- Use placeholders to create a custom list of user input anywhere in the mail.
- This allows you to set the order of the information.
- You can simply omit any fields that you do not want to send in the mail.
- You can use Notepad to format the layout of the mail, e.g. with paragraphs and bold.
Note: If you have enabled the Show download link option for the user mail, the placeholder for File Upload type fields will be replaced with the download link. Otherwise the placeholder will be replaced with the original name of the uploaded file.
Placeholder in the email configuration
You can also specify placeholders for specific form fields in the email configuration area. However, you must enter these placeholders manually, as described above.
Placeholder in the subject
You can use all placeholders in the Subject option of the emails.
Placeholders in the addresses
Placeholders for form fields of the type ‘E-Mail’ can be used in the E-Mail addresses.
Placeholder in the sender name
In the Sender Names option, placeholders of the two field types ‘Text’ and ‘Hidden’ can be used.
Placeholder in the success message
Visforms offers you the option of storing your own text in the form configuration under the “Result” tab. The text is displayed to the user after the form has been successfully submitted. More on this in: Processes after Submit. You can also use placeholders in this success message, which will be replaced with the user input from the form.