Content Plugin - Visforms form
Note: These features are part of the Visforms Subscription and are not included in the free Visforms version.
The Content Plugin - Visforms Form makes it possible to insert a Visforms form into an article. The form can be initialized with individual default values. Just write a specially formatted string in the article where you want the form to appear later.
The plugin
- finds the specially formatted string,
- reads the configuration parameters,
- removes the string from the article and
- inserts the form in its place.
Quick start Guide
- Install your Visforms Subscription.
- Go to the plugin manager and activate the “Content plugin - Visforms form”.
- Paste the plugin string in an article.
Install your Visforms Subscription
To be able to use this feature, you must have a Visforms Subscription installed.
Activate the plugin in the plugin manager
Newly installed plugins are disabled by default in Joomla. Please go to the plugin management under Extensions » Plugins. Select the plugin group “Content” and activate the “Content Plugin Visforms Form”.
Note: If the plugin is not activated, the string you use to insert the form into the article will not be deleted from the article.
Insert form into article
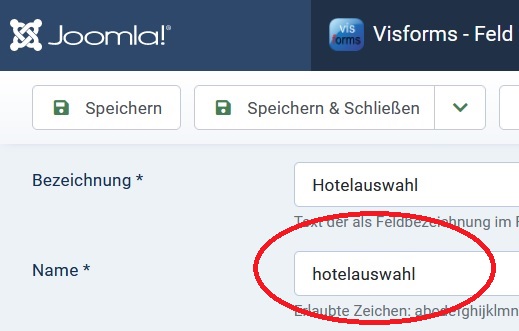
Find out the ID of the form you want to include in an article.
To do this, go to the “Components” menu item in the administration of your Joomla installation and then to the “Visforms” sub-item. You will now see a list of all forms that you have created. Make a note of the ID of the form you want to include in an article. The ID can be found in the ID column at the very end of the table row.
Now, in the Joomla administration, open the article where you want to insert the form. Paste the following string into the article where you want the form to appear. You must replace the value after "formid”:“1" with the form ID that you wrote down.
{vfformview}{"formid":"1"}{/vfformview}
The string {“formid”:“1”} is a parameter that you pass to the plugin. The plugin supports several parameters (see below). The <span class=code">formid parameter is a mandatory parameter that you must always specify.
Syntax rules
- The character string always starts with
<{vfformview}. - The character string always ends with
{/vfformview}. - Plugin parameters always consist of a name-value pair.
- Parameter name and parameter value are in double inverted commas
"name" and "value". - Parameter name and parameter value are separated by a colon ::
"name”:“value". - Multiple name-value pairs are separated by comma ,:
"name-1”:“value-1”,“name-2”:“value-2". - The complete parameter listing is enclosed in curly brackets {}:
{“name-1”:“value-1”,“name-2”:“value-2”}. - Avoid all spaces in the entire string. Spaces are only allowed as part of a parameter value:
"my-first-name”:“my first-name value".
All in all:
{vfformview}{"my-first-name":"my first value","my-second-name":"my second value"}{/vfformview}
Note: The plugin removes the plugin string from the article even if there are typos in it. In this case, however, no form is displayed.
A plugin string that is not displayed in the article, in connection with the simultaneous absence of the form display, is a sign that there is a syntax error in the plugin string.
The plugin supports the following parameters in the plugin string
| Name | Default value | Value | Function | Mandatory field |
|---|---|---|---|---|
| formid | No default value set | Form ID | Select the form you want to display. | yes |
| urlparams | No default value set | List of field names and default values (format see below) | Individual default values set in form fields. | no |
| show_page_heading | "true" | "true" or "false" | Control the display of the form title. "true" = show, "false" = hide | no |
| pageclass_sfx | "" | Any string | The "div" element that wraps the form, has a custom class-attribute for custom formatting using CSS. | no |
| connected_menu_item | "" | A menu item ID | There are problems on some websites ( Error) when submitting the form if the form is not displayed via a menu item. If this problem occurs on your website, you may be able to fix it with the help of this parameter. To do this, follow these steps. Create a menu entry of the type Visforms >> Form for the form. The menu item must be published, but it can be in a so-called hidden menu, i.e. a menu that is not displayed via a module on the website. Then enter the ID of this menu as the value for the "connected_menu_item" parameter in the plugin string. | no |
| redirecturl | "" | Individual redirect URL | Internal or external URL to the success page to which the user is forwarded after he has successfully submitted the form. Please note that you always have to use the original URL for internal URLs (e.g. index.php?option=com_content&view=article&id=10&Itemid=45) not the search engine friendly URL! Please note: You must activate the option "Allow individual redirect in Content Plugin" in the form configuration on the "Result" tab if you want to use this feature. | no |
| "" | email address | Additional mail-TO email address for the result mail. You can enter more than one email address. Separate the email addresses with commas. | no | |
| mailcc | "" | email address | Additional mail-CC email address for the result mail. You can enter more than one email address. Separate the email addresses with commas. | no |
| mailbcc | "" | email address | Additional mail-BCC email address for the result mail. You can enter more than one email address. Separate the email addresses with commas. | no |
Set individual default values in the form
Setting individual default values in the form is done with the help of the plugin parameter urlparams.
- Create a field in the form for which you want to set an individual default value. This can be a “Hidden” field or any other visible field type except for the “Textarea”, “Checkbox” and “File Upload” types.
- Enable the “Allow URL parameters” option in the “Advanced” tab in the configuration of this field.
- Make a note of the field name. You will need the field name later in the plugin parameter.
- If the field is of type “Checkbox Group”, “Listbox” or “Radio Button”, also note the values of the options you have created for the field. You will need these later in the plugin parameter.
- Add the urlparams parameter to the plugin string in the article.
- In contrast to the other plugin parameters, the parameter value of urlparams itself is a collection of name-value pairs. The listing of name-value pairs must follow the same spelling rules described above.
- Use the noted field name as the name and the default value that you want to insert as the value.
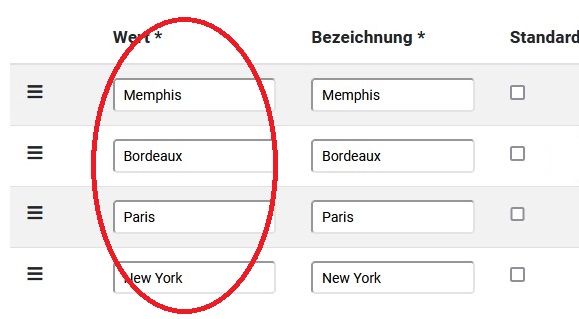
- This must be a valid option value of the field for checkbox groups, list boxes and radio buttons The one you noted above. You can specify any free value for all other field types. However, the value should match the field type, e.g. a numerical value for fields of the “Number” type.
The complete character string part for the parameter urlparams therefore has the following format:
"urlparams":{"fieldname1":"defaultvalue1","fieldname2":"defaultvalue2"}
Possible default values for list box, radio button and check box group
Find the information you need for the list box, radio button, and check box group.
Page URL as default value
The procedure is largely the same as described under “Setting an individual default value in the form”. But instead of an individual default value, enter the character string [_url] as the parameter value in the last step.
Example:
You have created a form field called “hiddenurl” and activated the option “Allow URL parameters” for this field.
Now use the following character string in your parameter string.
"urlparams":{"hiddenurl":"[_url]"}
Article title as default value
The procedure is largely the same as described under “Setting an individual default value in the form”.
But instead of an individual default value, enter the character string [__articletitle] as the parameter value in the last step.
This placeholder stands for the title of the article in which the form with the Content Plugin - Visforms Form is embedded.
The value for the article title only exists if the form is directly within a Joomla article.
However, if the form is in a module (type ‘own HTML’) via Content Plugin - Visforms Form, the placeholder does not work.
This is the case even if the module containing the plugin string is displayed on a page containing the article.
Note: If the plugin string is not directly in the article, the placeholder will be ignored when setting default values.
Example:
You have created a form field called “article-title” and activated the option “Allow URL parameters” for this field.
Now use the following character string in your parameter string.
"urlparams":{"article-title":"[_articletitle]"}
Title of the HTML document as default value
The procedure is largely the same as described under “Setting an individual default value in the form”.
But instead of an individual default value, enter the character string [_title] as the parameter value in the last step.
Example:
You have created a form field called “page-title” and activated the option “Allow URL parameters” for this field.
Now use the following character string in your parameter string.
"urlparams":{"page-title":"[_title]"}
Important Notes on ‘HTML Document Title’
The name ‘title of the HTML document’ is not always entirely correct and is slightly misleading.
The placeholder [_title] is replaced in the Visforms code with the return value of the following function:
Factory::getApplication()->getDocument()->getTitle()
Unfortunately, what exactly is in this return value is a bit more complex.
It depends on what type of content is being viewed (e.g. single article, blog article page, or other).
In addition, the value can also be set by menu items, for example, and then these higher-level settings overwrite everything that comes from the article.
It has become a little more unpredictable in Joomla 4 what the function actually returns in individual cases.
Information of the logged-in user as default values
Pass the name, username and user email address of the logged-in user as default values to a field.
This is also possible for hidden fields.
The procedure is largely the same as described under “Setting an individual default value in the form”.
Instead of an individual default value, enter one of the following character strings as the parameter value in the last step:
- [_name],
- [_username] or
- [_email].
Data from the Joomla user profile
You can also pass data from the logged-in user’s Joomla user profile as a default value to a field. This is also possible for hidden fields. \
Instead of an individual default value, enter one of the following character strings as the parameter value in the last step:
- [_address1],
- [_address2],
- [_city],
- [_region],
- [_country],
- [_postal_code] or
- [_phone].
Custom Fields from Joomla User Profile
You can create so-called custom fields in the Joomla user component. A user must fill out these fields upon registration. This information, along with the default user information, is stored in the database. This is a very useful feature. Because the Joomla user component can be really customized. This user information from custom fields that you have created in the user component can be used as default values in a Visforms form.
Note: Please note that only "Text" type custom fields can be used for compatibility reasons. Also, only default values of Visforms fields of type "Text" can be set with custom fields.
Please use the following placeholder: [_CF1].
The “1” represents the ID of the custom field whose value you want to use and must be replaced by you.
Example string with all parameters
{vfformview}{"formid":"4","urlparams":{"hotel selection":"House Astoria"},"show_page_heading":"false","pageclass_sfx":" myclass"}{/vfformview}