Display data in overview view one below the other
Note: These features are part of the Visforms Subscription and are not included in the free Visforms version.
The Visforms Subscription expands your options for designing the data views in the frontend individually and flexibly. In particular, you can specify that data records in the overview view in the frontend (data list view) are not displayed as table rows, but rather all data in a data record one below the other.
The starting point
Horizontal arrangement of the information
By default, data in the overview views in the frontend is displayed as a table in which the data of a data record is in one row. This type of representation is compact and well suited for many applications.
However, this representation has its limits. Especially if you want to display a larger amount of information per data record in the overview view. In these cases, the table quickly becomes too wide for one page. This often occurs on narrow devices in particular.
Vertical arrangement of the information
A vertical data view offers a special advantage in these cases. Here the data of a data set are arranged vertically one below the other. Any amount of information per data set can be displayed clearly and easily readable. Thanks to a fundamental revision of the search filters for Visforms, the user can search, filter and sort all datasets in the usual way.
Custom field order
Set a custom field order for the data view to arrange the display of information for each record in the desired order. For example in such a way that an uploaded picture is always at the top. More in: Field Order in Views.
Menu option to select data orientation
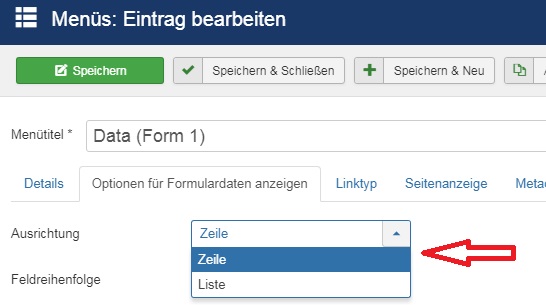
The alignment of a record’s data in the data overview can be specified using the new menu option “Orientation”.
Please set this setting to “List”.
See also the figure below.

The layout
No CSS when selecting “List” option
It is our goal to enable the most versatile view of the data possible. Therefore, we have decided on the following. If you select the “List” option above, we do not add any CSS to the resulting view.
Well-structured HTML
Instead, we build the whole page with a very well-structured HTML. In it, all elements can be addressed meaningfully and directly via really simple CSS selectors.
Write your own CSS
This means that you write your own CSS to freely design the view according to your needs. Of course, there are also Visforms users who have not yet had much experience with CSS. For those users, below is a complete step-by-step CSS example that will be used to bring the page into a nice looking shape.
HTML structure
Empty elements are not created.
<table class="visdatatabledatahorizontal visdata visdatatable jlist-table">
// The tr element is repeated for each record
<tr>
<td>
// wrapping element the main overhead field (Counter, ID, edit-link, publish-link, created)
<div class="div-data-controls">
//overhead fields
<div class="div-data-counter">
// labels
<span class="vfdvlabel data-counter"></span>
// Value
<span class="vfdvvalue data-counter"></span>
</div>
<div class="div-data-id">
<span class="vfdvlabel data-id"></span>
<span class="vfdvvalue data-id"></span>
</div>
<div class="div-data-edit">
<span class="vfdvvalue data-edit"></span>
</div>
<div class="div-data-publish">
<span class="vfdvvalue data-publish"></span>
</div>
<div class="div-data-created">
<span class="vfdvlabel data-created"></span>
<span class="vfdvvalue data-created"></span>
</div>
// Fields with field ID after the f in the class (e.g. div-data-f13)
<div class="div-data-f"">
<span class="vfdvlabel data-f"></span>
<span class="vfdvvalue data-f"></span>
</div>
// Remaining overhead fields
<div class="div-data-ip">
<span class="vfdvlabel data-ip"></span>
<span class="vfdvvalue data-ip"></span>
</div>
<div class="div-data-mfd">
<span class="vfdvlabel data-mfd"></span>
<span class="vfdvvalue data-mfd"></span>
</div>
<div class="div-data-modifiedat">
<span class="vfdvlabel data-modifiedat"></span>
<span class="vfdvvalue data-modifiedat"></span>
</div>
</td>
</tr>
</table>
Sample CSS
It is best to create your own Visforms CSS file in which you can store your individual CSS for styling the data view.
Follow these steps to create your own Visforms CSS file:
- Click on the “CSS Edit” tile in the Visforms Dashboard.
- Click on the “Create new file” button.
- Select the file type “CSS” and assign a file name, such as “customdataview”.
- Then click “Create”.
Note: Note the naming convention. The file name must contain the string "custom".
Otherwise, allowed in the file name are
- the letters a-z and A-Z and
- the special characters - (minus) and _ (underscore).
Enter the following sample CSS in the CSS file and save the file. You can also enter only individual parts of the example CSS in the CSS file that correspond to your layout ideas.
Preferably omit the comments between /* and */. These are only included here to explain what each code is for.
These few CSS lines are enough to make the data view clear.
/* give div elements a margin at the top and bottom */
.visdatatabledatahorizontal div {
   padding: 10px 0;
}
/* display overhead items at the top of a line */
.visdatatabledatahorizontal .div-data-controls > div {
   display: inline;
}
/* label bold, like title */
.visdatatabledatahorizontal span.vfdvlabel {
   font-weight: bold;
   padding: 0 10px;
}
/* : insert after the label */
.visdatatabledatahorizontal span.vfdvlabel:after {
   contents: ":";
}
/* add some space to the front and back of the value */
.visdatatabledatahorizontal span.vfdvvalue {
    padding: 0 10px;
}
/* Limit maximum size for images */
.visdatatabledatahorizontal img {
   max width: 50%
}
Note: We use the .visdatatabledatahorizontal CSS selector everywhere first to target only the HTML generated by the data view with the "list" orientation.
You can hide all labels or only selected labels
/* hide all labels */
.visdatatabledatahorizontal span.vfdvlabel {
   display: none;
}
/* Hide selected label (label of field with ID 15) */
.visdatatabledatahorizontal span.vfdvlabel.data-f15 {
   display: none;
}
After you hide the label for a field, you can right-align the value.
.visdatatabledatahorizontal div.div-data-f15 {
 text-align: right;
}